
Are you ready for opening day? We asked Levi Morgan and Chance Beaubouef, two of the country’s best pro archers and both serious bowhunters, to tailor this four-week training program to get you ready for the opener.
The Warm-Up
The first step in shooting tighter, more consistent groups is ensuring that you and your bow are working perfectly together. Where most hunters go wrong, according to our experts, is in draw length and bow balance. Use these two warm-up exercises to get both exactly right.
WARM-UP NO. 1: DRILL DOWN ON DRAW
Instructor: Levi Morgan, 11-time IBO/ASA World Champion, 12-time Shooter of the Year, more than 50 P&Y trophies
The Goal: Shoot the perfect draw length.
→ “I can’t tell you how many hunters I see shooting the wrong draw length—and yet it is absolutely fundamental to consistent shooting,” Morgan says. If your draw length is even a little too short, you’ll tend to push or pull too hard at full draw, which causes left-to-right misses, he explains. If it’s too long, you’ll creep up off the back wall, which causes high and low misses. “You’ve got to get this dialed in before you start any serious training on the range.”
The Exercise
1. Have a friend take a profile photo of you at full draw, and look for any of the four problems illustrated here.
2. Put a target out at 30 yards and shoot one arrow every 15 minutes or so until you have a five-shot group of all first-shot arrows. “I see guys who are 4 inches off left or right with their first shot, who say, ‘That’s just me; I’ll get it back in a minute,’” says Morgan. “Well, that doesn’t work out so well for hunting.”
3. If your shots are consistent, do nothing. If they are sprayed left and right, you probably need a longer draw length. If they are scattered up and down, you need to go shorter.
4. If the problem is minor, try adjusting the length of your D‑loop. Otherwise, go 1⁄2 inch longer or shorter and try again. (If you have fixed cams, go see your bow-shop pro.)
Tip: When you get your draw length perfect, take another profile picture at full draw to use for future reference.
A: A line extended straight back from the arrow nock should split the crease of the elbow. If your elbow is well above this line, your draw may be too short. If it’s below—and especially if it sweeps behind you—it’s too long.
B: Your head should be aligned with your spine, as shown. Too far forward indicates too short a draw; too far back, your draw is likely too long.
C: You want little to no bend in the bow arm. Lots of bend means the draw length is too short.
D: With a release, your anchor point should be just ahead of the ear. If it’s behind or way out in front, you’re probably too long or short.
WARM-UP NO. 2: SHIFT YOUR WEIGHT
Instructor: Chance Beaubouef, IBO World Champion, Indoor World Champion, 40 P&Y trophies, including a 175-inch whitetail
The Goal: Get your bow perfectly balanced.
→ A balanced bow stays on target when you aim, and an unbalanced one doesn’t. Yet hunters pretty much ignore bow balance. “Proof is in the 6-inch stabilizers on most field bows, which soak up a little vibration but are useless otherwise,” Beaubouef says. What you need is a longer front bar and especially a back bar to act as a counterweight for the rest, sight, and quiver. For hunting, Beaubouef uses a 12-inch front bar and a 10-inch back. “I get it. You don’t want to carry the extra weight,” he says. “Well, try it and see how much it improves your shooting. Then decide.”
The Exercise
1. Close your eyes, draw, and anchor as usual. Open your eyes and check the sight bubble. If it’s centered, you’re good. But if it’s left or right, swing the back bar in or out until the bubble is centered.
2. Draw, anchor, and try to hold your aim on a small target. If the pin consistently drifts low, add a little weight to the back bar; if it tends to rise up off the target, subtract a little.
Tip: “It’s a feel thing,” says Beaubouef. “Once you’re roughly balanced, just shoot a lot and make small tweaks as you go until your pin settles in on the target and stays there.”
→ Your bow needs to be properly tuned for all of the exercises here. Specific tuning procedures vary from bow to bow, and are just complicated and mysterious enough to deserve their own article and video series, which you can view at fieldandstream.com/bowtuning. Meanwhile, Morgan and Beaubouef offer these tips.
1. Paper tune your own bow. Your bow-shop pro can time the cams, laser the center shot, fine-tune the nock travel, etc., but you have to paper tune your own bow, because your grip and form are unique to you and affect how your arrow flies. Both pros recommend bare-shaft paper tuning but say you can get away with paper tuning with fletched arrows for hunting.
2. Walk-back tune. Once your arrows are shooting bullet holes through paper, walk-back tune at least to your max field range. Then you should be good to go. ## The Workout This four-week training program will take you right to, or very close to, the start of the bow season in most states. For the first week, concentrate on the sighting, aiming, and trigger-release exercises. Then mix it up, focusing more on the shooting drills as your first hunt approaches.
The Workout
This four-week training program will take you right to, or very close to, the start of the bow season in most states. For the first week, concentrate on the sighting, aiming, and trigger-release exercises. Then mix it up, focusing more on the shooting drills as your first hunt approaches.
DRILL NO. 1: SIGHT RIGHT
Instructor: Morgan
The Goal: Set your sights for serious accuracy.
→ “A lot of hunters sight in on a GlenDel buck’s vitals or a big dot on a block target,” Morgan says. The problem is that everyone tends to shoot just well enough to hit the target. “If you sight in and practice at a softball-size bull at 30 yards, then your best groups are going to be roughly softball-size at that distance. You need to set your bow up to aim smaller.”

The Exercise
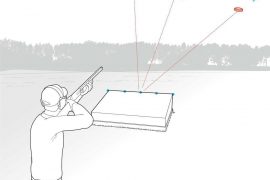
1. Use a level and a strip of masking tape to create a horizontal line on the target.
2. Step back to 20 yards and shoot several four-arrow groups, adjusting your 20-yard pin up or down,…